Introduction
Formulators of multi-component adhesives, potting and encapsulation materials are careful not to supply products with entrapped air. They do this by manufacturing under vacuum or degassing them before supplying to the end user. Consequently, entrapped air in a mixed material is usually a processing issue.
Voids Are Undesirable
Trapped air or voids (which might not actually contain air) can cause failures in electronics assemblies, whether they be micro-encapsulated wire bonds or large potted power supplies. Voids can subvert the very purpose of the encapsulating polymer, by compromising thermal conductivity and heat dissipation, or the electrical insulation properties. Voids and delamination provide pathways for moisture or other contaminants which can lead to short circuits or chemical damage. Bubbles in the polymer weaken its physical structure, allowing greater susceptibility to damage or cracking from physical or thermal shock.
Imagine some electronics which have been potted in a polymer – a PCB assembly in a block of plastic. If we grind away the block, layer by layer, we can reveal various features, including voids.

Figure 1 – Grinding away the layers, almost completely through the PCB, uncovers two copper tracks, and in the centre, the remaining solder resist. Under the resist, some voids in the potting compound are apparent.
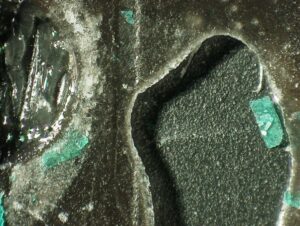
Figure 2 – Grinding away the final layers on the PCB, the voids are exposed. This is a good method of troubleshooting potted circuitry. (Pictures and method courtesy www.bobwillis.co.uk)
Common Causes
Common causes of air bubbles or voids in a final encapsulated or potted component are:
• Incorrect storage of the materials
• Hand mixing of the resin and hardener
• Compound not degassed correctly
• Improper application
• Air saturation from pressurised feed systems
• Reaction with contaminants on the parts to be protected
• Shrinkage of the compound during cure
Storage
Correct storage of materials is an important step in ensuring that the compounds do not absorb moisture. Some chemistries, polyurethanes in particular, are hygroscopic and readily absorb moisture from the air, which reacts to form a gas. They are packaged in airtight containers and/or with desiccants. Taking care in handling the materials in accordance with the manufacturer’s recommendations can prevent problems later.
Mixing
If hand mixing, do this gently, so as not to introduce air into the mixed materials.
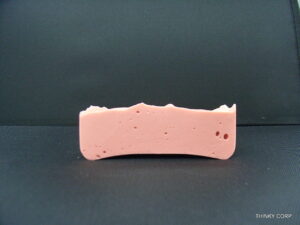
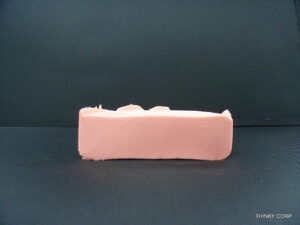
Figure 3 – The sample above was mixed by hand. The sample below was mixed by a planetary centrifugal mixer
Better still, look at non-contact methods of mixing, such as planetary centrifugal mixers or automated metering and mixing systems. If using metering and mixing equipment, ensure that this is regularly maintained and avoid introducing air during replenishing.
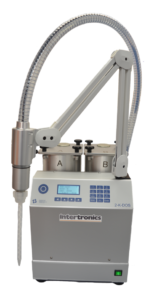
Figure 4 – A dedicated metering, mixing and dispensing machine will prepare materials without entrapping air (2-K-DOS Metering, Mixing and Dispensing System)
Air Removal
If air inclusion from mixing is unavoidable then consideration may need to be given to removal, remembering that small bubbles can become bigger later in the process, either through consolidation, or through expansion due to the heat given off by the exothermic reaction of cure. Bubbles which are not noticeable to the naked eye in a just-mixed product can suddenly be obvious in a cured material.
Low viscosity materials may be able to adequately degas themselves. For best results, use a container with a large surface area and shallow depth. Bubbles which rise to the surface and remain can be scooped off. Gentle heating will help to bring bubbles to the surface. Use a temperature which doesn’t compromise the working life of the material. Fillers are likely to impede self-degassing, and they can tend to harbour micro-bubbles attached to their surface.
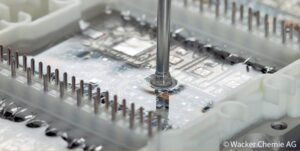
Figure 5 – Low viscosity potting compounds with no fillers readily displace air, fill gaps and are more likely to self-degas
For higher viscosity products, or where there just isn’t enough production time to allow unaided degassing, vacuum can assist or speed up the process. Vacuum chambers may be used to degas the material if the mixed working life allows time for this process. Generally, a vessel five to six times the volume of the material being degassed is required in order to prevent spillage as the mixed material expands during vacuum. A good starting point is to set a vacuum of 25-29 inHg (~0.85-1 bar), apply for two minutes and check the result. Effectiveness will depend on viscosity, and so adjust time and pressure accordingly; low viscosity materials may degas with appreciably less vacuum. It is an option to pulse the vacuum a few times to aid the removal of more obstinate bubbles.
Care should be taken not to pull too much vacuum for too long as some constituents can be volatile and will more readily evaporate off at the lower pressure. This alters the formulation of the material, which can then affect its physical characteristics and performance. The same issue can occur when mixing under vacuum, especially if the mixing process causes a temperature rise, which increases the volatility of some components of the formulation.
Centrifugal force can also be used to degas the material prior to application. In practice, we see this most often when using a planetary centrifugal mixer, which mixes and degasses plural component materials of multiple viscosities (liquids and pastes), and also powders. The non-contact mixing action (revolution and rotation) does not add air, and in fact tends to remove it. An additional “defoaming” mode applies a more direct centrifugal force to the mixed materials, separating out the air. Care must be taken not to separate any fillers or heavier constituents with the centrifugal action, although they can be re-amalgamated with a subsequent mix step. For critical applications, these planetary centrifugal mixers can be configured so that the mix happens under vacuum.
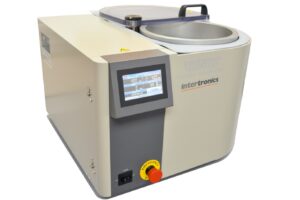
Figure 6 – A planetary centrifugal mixer with integral vacuum is used to mix materials where even 100μm micro-bubbles are not acceptable (THINKY ARV-310P)
Application Methods
Once the compounds are mixed and we are happy that there are no significant air bubbles present, it is important not to introduce or entrap air during application. Techniques to eliminate or minimise air bubbles in the completed assembly include pouring or injecting in stages, in order that any air is driven out rather than being trapped under components or in other nooks and crannies. Tilting the assembly, filling from the bottom and perhaps preheating to reduce viscosity and surface tension can help. Certain assemblies may benefit from designing in vent holes to allow air to escape during filling. In critical applications which are geometrically challenging, the potting can be done under vacuum, or the potted unit can be vacuum degassed prior to cure. Another tactic is to place the potted parts onto a vibrating table, which can help release trapped air
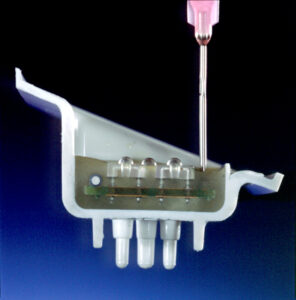
Figure 7 – Care must be taken to avoid entrapped air under PCB assemblies, where there may be significant gaps
Pressurised feed systems can also saturate the material with dissolved air, which can result in appreciable bubbles further along the process. It is good practice to depressurise systems when not in use, and to use only as much pressure as required to move the material at the required rate. Alternatively, this can be avoided by having some form of barrier between the compressed air and the material being dispensed, or by using some form of pump.
Contamination
The uncured potting compound or encapsulant can react with contaminants on the component, and this can lead to a lack of adhesion and subsequent delamination, or the formulation of gas bubbles – both of which cause voids. Soldering flux residues, mould release compounds and metal extrusion lubricants are some examples of potentially harmful contaminants. Certain chemistries will react with residual moisture; polyurethane compounds will generate carbon dioxide in reaction with water. We have seen instances of condensation forming on assemblies brought into a warm factory area from a cold warehouse, leading to bubbles in a polyurethane potting compound. It is best practise to allow parts to acclimate before processing. Contamination issues can be resolved by using cleaned and dried assemblies.
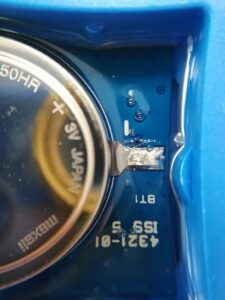
Figure 8 – Moisture on the surface of the PCB assembly caused CO2 bubbles to form in the polyurethane potting compound
Shrinkage
Shrinkage of the compound may also allow voids to be created in parts of the assembly. Again, applying the materials in stages can minimise this by allowing the materials to fill any gaps left by the shrinkage after cure.
Conclusion
It is important to not introduce processes unnecessarily. Potting and encapsulating processes are simplified if a process friendly viscosity can be specified. Low viscosity allows easier mixing, self-levelling and self-degassing. But higher viscosity is often necessary; fillers add required functionality like thermal conductivity, encapsulants need to form a dome shape if glob-topping, and flow control may be needed to prevent unwanted ingress into other parts of the assembly. Work with a supplier who can offer you a range of materials alongside application advice and complementary equipment.
.
Picture credits- Figure 3 – www.thinky.com
INTERTRONICS supplies adhesives, coatings, sealants and equipment to customers with high technology, high performance assembly applications. www.intertronics.co.uk
© Paul Whitehead, January 2021